So you just stumbled across your first locked safe in Resident Evil Requiem and you’re standing there, staring at a dial, wondering why Capcom enjoys putting loot behind combination locks. Don’t worry, you’re not alone, and the answer is “yes, it’s worth cracking every single one.”
This guide covers all five Resident Evil Requiem safe codes, their exact locations, what’s inside each one, and the one critical safe you can permanently miss if you’re not paying attention. Let’s get into it.
How Safes Work in Resident Evil Requiem
Before diving into the codes, a few things worth knowing upfront.
There are six safes total in the game, but only five require a combination. The sixth, sitting in the Care Center Waiting Room, has already been pried open, it holds 2x Antique Coins and requires zero effort on your part. Lucky you.
All five combination safes are found exclusively during Grace’s gameplay sections. Leon never interacts with them, which makes sense when you remember he’s busy doing his own thing across town.
Each combination uses a three-number dial sequence. Direction matters just as much as the numbers themselves. If you input the wrong direction or the wrong number, the dial simply resets and lets you try again – no consequences, no lockout timer.
One more important note: The safe codes on Normal/Casual/Standard difficulty are the same for every player. They are not randomly generated. On Insanity difficulty, however, the codes change. This guide focuses on Normal difficulty codes.
Opening all five safes unlocks the “No Safe Is Safe” trophy and achievement.
Resident Evil Requiem Safe Codes – Rhodes Hill Care Center
The first three safes appear in the Care Center during the early part of the game. You’ll find two of them fairly quickly, but the codes take a few hours to unlock, so don’t panic if you find the safe before the combination.
Safe 1 – Bar & Lounge (West Wing, 1st Floor)
Code: Left 10 → Right 80 → Left 30
This is the first safe you can realistically open in RE9. Head to the West Wing’s first floor, go behind the bar counter, and look to the right of the flower arrangement. Clear out the enemies in the room before you start spinning dials – nothing kills the mood quite like a zombie grabbing your arm mid-combination.
The code itself – left 10, right 80, left 30
Clue location: Found on a desk in the first floor Office.
Reward: 3x Antique Coins
These Antique Coins matter early. You need a solid stack of them to buy Grace’s upgrades from the Parlor, including the Hip Pouch and Stabilizer damage upgrade.
Safe 2 – Examination Room (East Wing, 1st Floor)
Code: Right 30 → Left 10 → Right 50
Enter the East Wing, turn left at reception, and head into the Examination Room. The safe sits on a shelf to the right of a body on the floor. It’s a bit grim, but this is a Resident Evil game – that kind of scenery comes with the territory.
The combination – right 30, left 10, right 50
Clue location: Found in the blood-stained locker room near the Lead Researcher’s Office on the second floor.
Reward: 3x Antique Coins
Safe 3 – Basement (Near the Forklift)
Code: Right 60 → Left 40 → Right 80
⚠️ This one is missable. Read carefully.
The Basement safe sits on a table in a small tool room near the forklift, next to the Workshop area. Finding the safe itself is straightforward – finding the clue is the tricky part.
Here’s what makes this safe different: the clue appears during Leon’s gameplay section, not Grace’s. As GameSpot explains, after the Chunk boss battle, Leon finds a cabinet with a warped door in the Attic Storage. You need to use your Hatchet to pry it open. The document inside contains the Basement safe code.
If you read it as Leon, the clue saves to your file log and remains accessible even after you switch back to Grace. But if you miss it, Grace cannot return to the Basement once she leaves the area – the game does not offer chapter select.
The good news? You already have the code right here: right 60, left 40, right 80. Open it without the file if you have to.
Reward: Raccoon Roundup Map (Rhodes Hill) + Handgun Ammo
The map reveals every Mr. Raccoon collectible location in the Care Center – useful if you’re going for 100% completion.
Resident Evil Requiem Safe Codes – The ARK Facility
The final two safes appear much later in the game, deep inside the ARK research facility. Both are opened exclusively as Grace. The codes for both are found in Bioweapon Repository 05, which you reach after obtaining the Magnetic Key.
A critical warning from Game Rant: once you enter the red door in the Lobby after the Relapsed Panel puzzle, you cannot return. Grab both ARK safes before you do that.
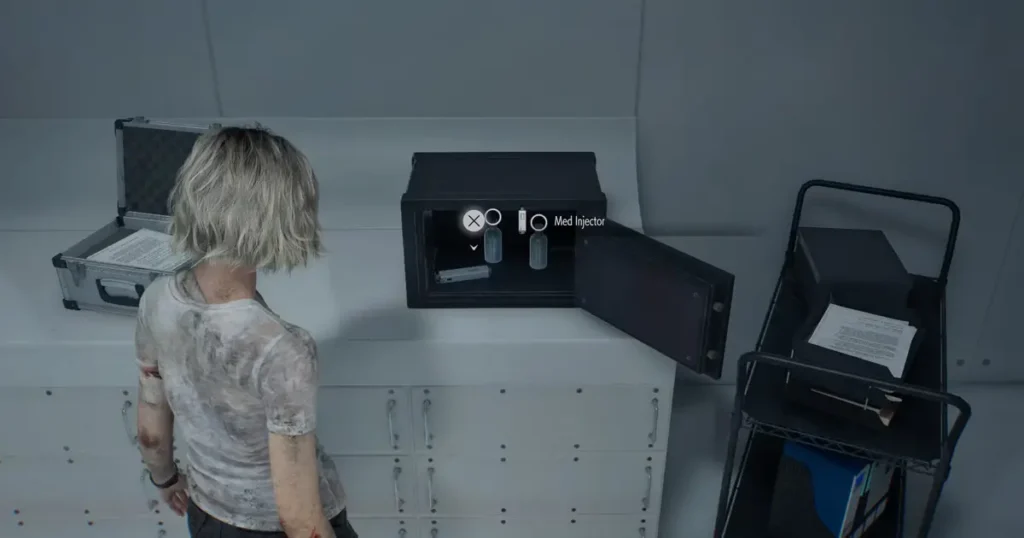
Safe 4 – Sterilization Chamber
Code: Right 10 → Left 90 → Right 20
After playing as Leon briefly in the ARK section, you switch back to Grace. Progress to the Lab Entrance’s typewriter save point, then go through the door on the right to reach the Sterilization Chamber. The safe sits on a shelf counter toward the northeast wall.
The room is packed with Lickers. Watch for broken glass on the floor, stepping on it alerts them instantly. Sneak carefully or clear them out before you approach the safe.
The combination – right 10, left 90, right 20
Clue location: On top of a crate just before entering Bioweapon Repository 05, after descending the stairs.
Reward: 15x Handgun Ammo, 1x Med Injector, 1x Molotov Cocktail
Safe 5 – Monitor Control Room
Code: Left 50 → Right 60 → Left 80
The final safe is in the Monitor Control Room, directly opposite the door you enter through. The room is relatively calm compared to the Sterilization Chamber – no Lickers, no ambushes. It’s almost peaceful, which in Resident Evil means something is probably about to go wrong.
The combination – left 50, right 60, left 80
Clue location: Inside the middle shipping container on the right side of Bioweapon Repository 05.
Reward: 1x Med Injector, 1x Acid Bottle, 1x Empty Bottle
All Safe Codes at a Glance (Normal Difficulty)
| Safe | Location | Code |
|---|---|---|
| Bar & Lounge | Care Center, West Wing 1F | Left 10 → Right 80 → Left 30 |
| Examination Room | Care Center, East Wing 1F | Right 30 → Left 10 → Right 50 |
| Basement | Care Center, near forklift | Right 60 → Left 40 → Right 80 |
| Sterilization Chamber | ARK Facility | Right 10 → Left 90 → Right 20 |
| Monitor Control Room | ARK Facility | Left 50 → Right 60 → Left 80 |
Note: Codes differ on Insanity difficulty. Locations of safes and clue files remain the same across all difficulties.
Tips Before You Start Safe-Hunting
Keep manual saves. Resident Evil Requiem has no chapter select. Everything in the game is technically missable. A manual save before leaving each major area can save you a full replay.
Antique Coins are a priority. The Bar and Examination Room safes each give you 3 Antique Coins. You need a good number of them to buy upgrades from the Parlor early on, including inventory expansions and combat upgrades for Grace. These two safes alone make the early game noticeably smoother.
Don’t skip the Basement clue as Leon. Even if you know the code already, picking up the file adds it to your document log. It’s a small thing, but completionists will want every collectible tracked.
Clear enemies before opening safes. Particularly in the Sterilization Chamber, the Lickers are not forgiving. You do not want to be mid-dial-spin when one of them notices you.
Final Word
Resident Evil Requiem keeps the classic safe-puzzle tradition alive, and honestly, it works. There’s something satisfying about hearing that click after you nail the combination, even when you cheated a little by reading a guide. No judgment here.
Once you open all five safes as Grace, the “No Safe Is Safe” trophy or achievement is yours. It’s one of the cleaner completion milestones in the game, and the loot you collect along the way genuinely helps you survive the later sections.
Good luck out there. Keep your saves fresh, your Antique Coins stocked, and your ears open for anything breathing in the dark.