There’s nothing worse than being all hyped to dive into Battlefield 6, only for your system to throw an error saying “Secure Boot or TPM 2.0 not enabled.”
Yeah, that one. It’s frustrating, especially when your rig can handle 4K explosions but somehow fails a simple security check.
The good news? It’s not a hardware issue for most gamers. These settings are already built into your motherboard; they’re just turned off by default. A few quick tweaks, and you’ll be ready to jump back into the chaos where it belongs, on the battlefield, not in your BIOS menu.
Why This Even Matters
Battlefield 6 is pushing PC systems harder than any past entry. EA and DICE are tightening up security to prevent tampering and cheating, that’s where Secure Boot and TPM 2.0 come in.
- Secure Boot locks your system to start only with trusted files. It basically says, “no funny business at startup.”
- TPM 2.0 adds hardware-level protection for things like encryption and identity checks. Think of it as a security chip that keeps your system clean from unseen meddling.
For you, the player, enabling these two isn’t about locking things down, it’s about making sure the game installs, launches, and runs without the dreaded compatibility errors that newer titles tend to demand.
Check Before You Panic
Let’s start easy. Before jumping into your BIOS, let’s see if these features already exist on your system.
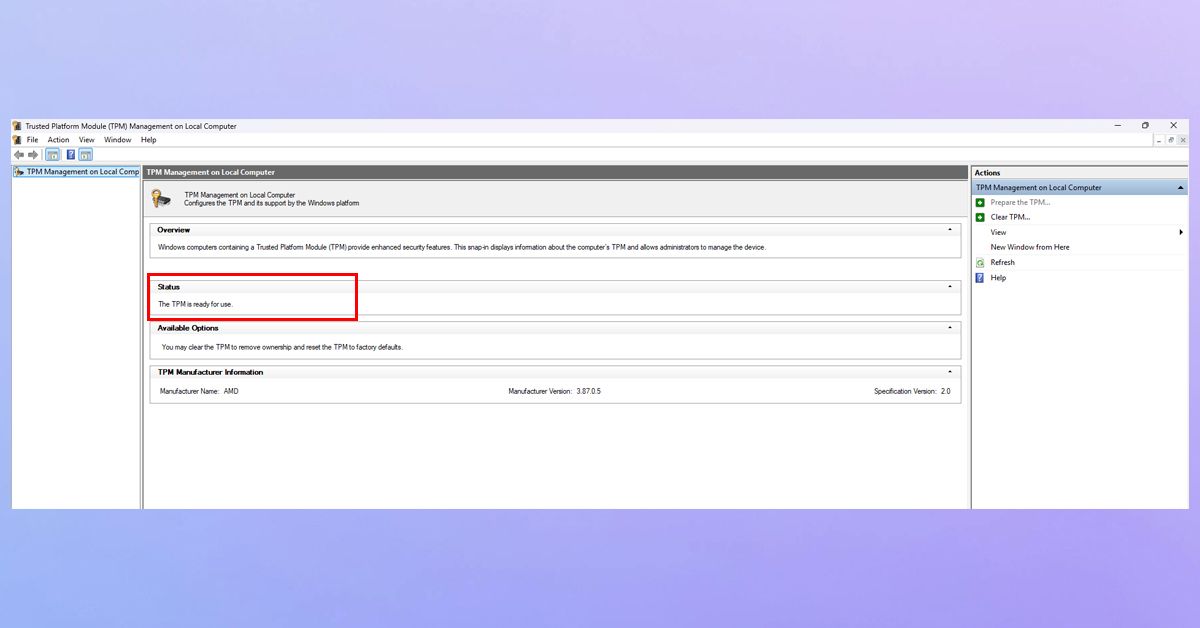
Step 1: Checking TPM 2.0
- Press Windows + R, type tpm.msc, and hit Enter.
- A small window will pop up.
- If it says “TPM is ready for use” and mentions Version 2.0, you’re already good.
- If it says “Compatible TPM not found”, don’t freak out yet, it’s probably just turned off.
Step 2: Checking Secure Boot
- Hit Windows + R again and type msinfo32.
- In the System Information window, scroll down to find Secure Boot State.
- If it reads On, you’re all set.
- If it’s Off, or worse, Unsupported, it’s time to roll up your sleeves.
Getting Into BIOS (The Nerve Center)
Now comes the part that sounds scary but really isn’t. You’re going into your BIOS, basically your PC’s command center.
- Restart your computer.
- As soon as it starts, tap your BIOS key repeatedly – usually DEL, F2, or ESC (your motherboard’s splash screen should tell you or you can check on your motherboard’s manufacturer website).
- Once you’re inside, take a breath. You can navigate using arrow keys or your mouse, depending on your setup.
Turning On TPM 2.0
Different brands name it differently, but you’ll find it under something like Security, Advanced, or Trusted Computing.
Here’s what to look for:
- On Intel motherboards, it’s called PTT (Platform Trust Technology).
- On AMD, it’s fTPM.
Toggle it to Enabled, save your changes (usually F10), and reboot.
When you’re back in Windows, open tpm.msc again – it should now show “The TPM is ready for use.”
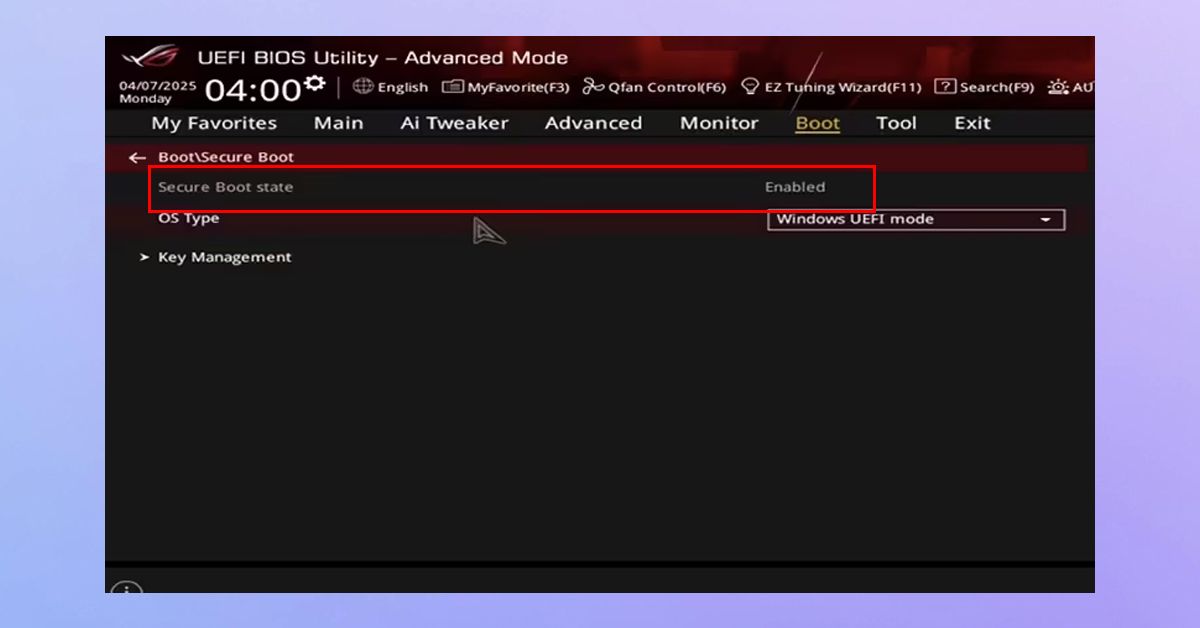
Turning On Secure Boot
Once TPM is up, stay in the BIOS and move over to the Boot or Security section. You’ll see an option called Secure Boot – it might be set to Disabled.
Before you enable it, check if CSM (Compatibility Support Module) is active. If it is, disable it first; Secure Boot doesn’t play well with CSM.
After that, switch Secure Boot to Enabled, save and exit. That’s it.
When Windows starts again, go back to msinfo32 and check, you should see Secure Boot State: On.
If You Hit a Wall
Sometimes you’ll enable everything correctly and still get errors. Here’s what might be happening:
- TPM Not Showing Up: Some BIOS versions hide it unless you’re running the latest firmware. A BIOS update from your motherboard’s website often fixes that.
- Secure Boot Unsupported: Check your disk format. Secure Boot only works with GPT, not MBR. You can convert without reinstalling Windows using the command prompt tool mbr2gpt.
- System Won’t Boot After Changes: That means something wasn’t fully compatible. Go back into BIOS, turn Secure Boot off temporarily, boot into Windows, update your drivers and firmware, then try again.
A Quick Sanity Check
Once you’ve done all this, confirm everything one last time:
- tpm.msc – TPM 2.0 is ready.
- msinfo32 – Secure Boot is On.
If both check out, congratulations, your PC now meets one of Battlefield 6’s most overlooked requirements.
Optional But Worth Doing
Before launching the game, it’s a good time to tidy up your system:
- Update Windows fully (even optional updates).
- Install the latest chipset and BIOS updates from your motherboard maker.
- Switch to UEFI boot mode if you’re still on Legacy.
These small things can make a big difference – not just for Battlefield 6, but for performance and security overall.
Ready for Deployment
After this setup, Battlefield 6 should recognize your system without any compatibility warnings. You’ll be able to install and play smoothly without the dreaded “Secure Boot or TPM missing” pop-up.
While many gamers overlook BIOS settings, enabling these two features future-proofs your PC for upcoming games and Windows updates.
So yeah, it’s not exactly as exciting as customizing your loadout, but once you’ve done it, you won’t have to think about it again. Flip the switches, lock in the settings, and go win your next battle.
If you still not able to fix “Secure Boot and TPM 2.0” error, you can check out this official post by EA on How to use Secure Boot on your PC.